User Interface Preferences
Set the user interface preferences to customize general application behavior.
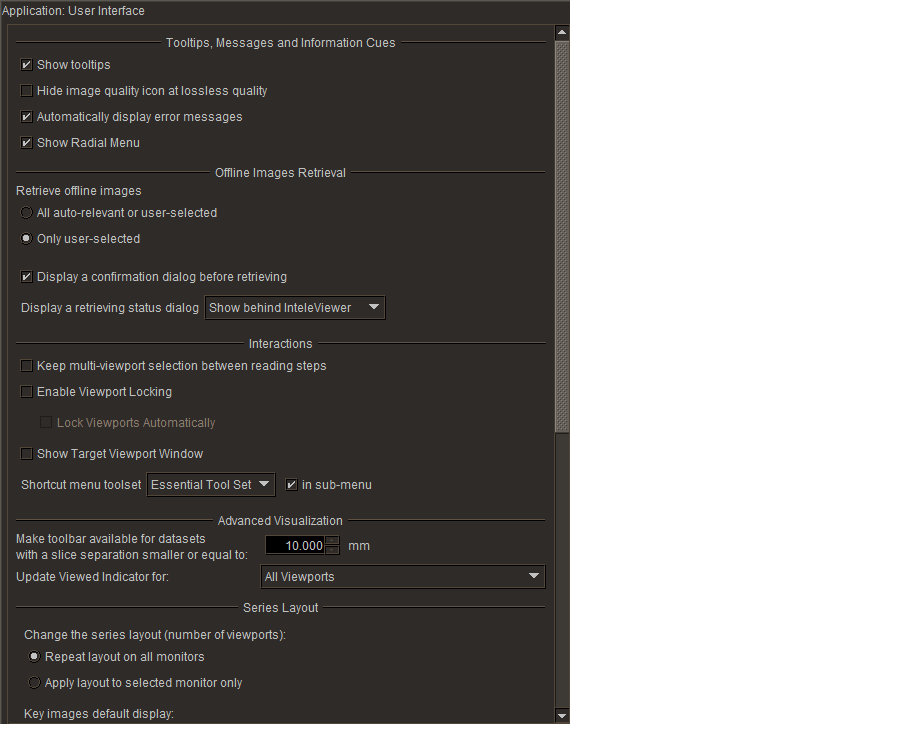
Tooltips, Messages, and Information Cues
Show TooltipsDisplays descriptive information when you place your mouse cursor over certain interface elements, such as the toolbar, Thumbnail strip, and radial menu. Disable Show Tooltips to hide the tooltips.
Hide Image Quality Icon at Lossless QualityAutomatically hides the image quality icon when the image is displayed at lossless quality. Disable this option to always display the icon.

This preference is ignored for lossy DICOM JPEG images.
Automatically Display Error MessagesAutomatically opens the Error Message dialog whenever an error occurs. When you disable this option, you can use the error indicator to monitor the status of error messages.
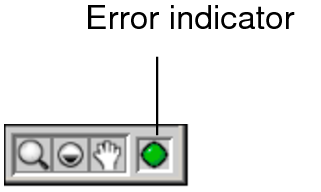
|
This color: |
Indicates: |
|---|---|
|
Red |
An error has occurred. Click the indicator to view the message. |
|
Black |
You have already viewed the error message. |
|
Green |
No errors have occurred during this session. |
You can manually display the Error Message dialog by choosing Utilities | Error Message List.
Show Radial MenuDisplays the radial menu when you right-click in a viewport. The radial menu toolset is specific to the modality of the current study. InteleViewer provides you with a default set of radial menu tools for each modality that you can customize in your User Configuration preferences. Disable Show Radial Menu to access the shortcut menu toolset when you right-click in a viewport.
Offline Images Retrieval
All Auto-Relevant or User-SelectedWhen you enable this option, if the current study matches a sequence protocol, InteleViewer automatically begins to retrieve offline images for relevant prior studies that match the sequence protocol. Once the offline images are brought online, InteleViewer displays the images in the Thumbnail strip and in the appropriate sequence protocol view.
You can also force InteleViewer to retrieve offline images for a prior study by enabling the corresponding check box in the Studies list or Patient Record tab.
Only User-SelectedWhen you enable this option, if the current study matches a sequence protocol, InteleViewer does not automatically begin to retrieve offline images for relevant prior studies that match the sequence protocol. Instead, InteleViewer retrieves offline images only when you enable the checkbox corresponding to the offline study in the Studies List or Patient Record tab. Offline studies appear with a ![]() icon in the Studies list.
icon in the Studies list.
If the checkbox corresponding to an offline study is already enabled in the Studies list, click the ![]() icon to retrieve the offline images.
icon to retrieve the offline images.
Display a Confirmation Dialog Before RetrievingWhen you enable this option, a confirmation dialog appears before InteleViewer retrieves offline images for a study. When you disable this option, InteleViewer begins to retrieve offline images without requiring a confirmation.
Display a Retrieving Status DialogSets whether to display the Retrieving Offline Data dialog as offline images are brought online. You can display the Retrieving Offline Data dialog in the foreground or background. If set to display behind InteleViewer, you must click in the taskbar to view the dialog during the retrieval process.
Interactions
Keep Multi-Viewport Selection Between Reading StepsKeeps multiple viewports linked while you change reading steps. As a result, you can navigate through multiple steps in a sequence protocol without having to re-select viewports each time you view a new step.
Enable Viewport LockingEnables the Viewport Locking feature, which you can use to associate the viewports with a particular study.
Lock Viewports AutomaticallyWhen you enable this preference, and then you drag a study into an empty viewport, InteleViewer locks the viewport for only that study.
Show Target Viewport WindowDisplays the Target Viewport window when you click and drag a thumbnail image from the Thumbnail strip to a specific viewport. This can be useful in a multiple-monitor configuration if, for example, you want to drag a series or study from the Thumbnail strip in the first monitor to one or more viewports in the fourth monitor.
You can choose to display the Target Viewport window when only more than 2, 3, or 4 monitors are currently spanned by the InteleViewer window. Disable this option to hide the Target Viewport window.
The Target Viewport window displays the predefined layouts for every monitor detected on your workstation, up to a maximum of six monitors. This number may not correspond to the physical monitors connected to your workstation. The monitor layouts that appear in the Target Viewport window are based on the layout profiles stored on the IntelePACS server for your workstation and user name. When you log in to InteleViewer, the system automatically detects the number of monitors used for viewing images and selects the appropriate layout profile. For example, if the system detects three monitors for viewing images, then InteleViewer selects the 3-monitor layout and you will see three monitors in the Target Viewport window.
Shortcut Menu ToolsetSelects the set of tools to display in the shortcut menu for all modalities when you right-click in a viewport. You can choose the Minimum, Essential, or Complete toolset. For example, choose Minimum to display the smallest toolset, which contains the Stack, Sort, Magnification Glass, Window Level, Zoom, Pan, Free Rotate, and Drag and Swap tools. The Patient menu also appears for each toolset.
If Show Radial Menu is enabled, the radial menu appears instead of the shortcut menu when you right-click in a viewport.
In Sub-MenuOrganizes the toolset options of the shortcut menu into a submenu, thereby separating the options from the Patient menu. Disable this option to view all of the toolset options and Patient menu in the same window.
Advanced Visualization
Make Toolbar Available For Datasets with a Slice Separation Smaller or Equal ToDetermines the maximum slice thickness permitted for displaying the Advanced Visualization toolbar. If the slice thickness exceeds the number indicated here, the Advanced Visualization toolbar is not displayed.
To use the Advanced Visualization toolbar, ask your PACS administrator to enable either the Image Reformat Functionality privilege or the Volumetric 3D Functionality privilege in your user account.
Default Slice Thickness for Custom SlabbingDefines the default slice thickness for Maximum Intensity Projection (MIP) when doing a custom slabbing of MR and CT images.
Update Viewed Indicator ForDetermines which images are marked as viewed (view status).
|
This option: |
Indicates: |
|---|---|
|
All Viewports |
Images in any viewport are marked as viewed. |
|
Same Monitor |
Only images which are on the same monitor as the current viewport are marked as viewed. |
|
Selected Viewports |
Images in selected viewports are marked as viewed. |
Series Layout
Repeat Layout on all MonitorsApplies the same viewport layout to all monitors on your workstation (if your system is configured to view InteleViewer across multiple monitors).
Apply Layout to Selected Monitor OnlyApplies the viewport layout that you have selected to only the current monitor.
Key Image Layout
Follow Current Image LayoutDisplays the images by using the current series image layout. This option is enabled by default. Images in a viewport are displayed according to the layout of that viewport.
Display All Key Images in a Tile FormatDisplays the key images in a tile format. This setting overrides the current key image layout.
When Returning To a Multi-Viewport Layout From a 1-Viewport Layout Opened By Double-ClickingSets whether to restore the original series when returning to a multi-viewport layout from a 1-viewport layout that was accessed by double-clicking a series. For example, if you double-click Series 1 in a multi-viewport layout to display the series in a 1-viewport layout, and then replace Series 1 with Series 2, choosing Restore the Original Series shows Series 1 in the viewport when returning to the multi-viewport layout. Choosing Keep the Current Series shows Series 2 in the viewport when returning to the multi-viewport layout.
Critical Results
Filter Critical Results Findings based on Selected LevelIn the Findings list, displays only critical results pertaining to the selected level.
Default Selected ActionAutomatically selects the default behavior for your critical result actions.
Default Selected Assistant ActionDisplays the action that appears by default when you select an action for your assistant.
Registration Data
Use Registration DataEnable to use the Auto Linked Stacking tool to synchronize series on parallel planes that have coordinate systems that are linked via DICOM registration data. Disable to ignore the DICOM registration data and stack only the series from the same study that share a unique coordinate system.
The Registration Data feature must be configured on your IntelePACS. This option is linked to the Use Registration Data option in the Linked Stacking Tool menu. For example, if you enable the option in the User Interface Preferences, the option is also enabled in the Linked Stacking Tool menu.
Automated Candidate Patient Selection
Automatically Consider Candidate Patients with a Minimum Confidence Level of [% value] as Being the Same PatientEnable this option to automatically set candidate patients that meet the minimum confidence level threshold as being the same patient as the current patient. Candidate patient orders that match the current Auto-Relevancy setting in the Patient Record tab automatically appear as relevant in the Studies list.
If you disable this option, you must manually select the candidate patient in the Patient Record tab to view the relevant orders.
The Automated Candidate Patient Selection feature requires IntelePACS configuration.