Measuring Lines, Areas, Angles, and Volumes
You can measure straight lines, elliptical regions of interest, simple angles, cobb angles, and volumes. Create multiple measurements of the same type or different types on a selected image, up to a maximum of ten measurement result lines per image.
Measurements are either in an active or inactive state. When you create a measurement it remains active until you click outside the measurement. It then becomes inactive. You can activate an inactive measurement with a single mouse click.
When you move your mouse over a measurement, it appears lighter to indicate that the measurement can be changed or moved when selected.
In the case of multiple measurements on an image, you can add a new measurement or adjust an active measurement that is in close proximity to a previous measurement without altering the state of the inactive measurement. This is useful when measuring lesions that are in very close proximity to one another or when measuring the distance between two existing linear lines.
The accuracy and reproducibility of measurements in InteleViewer is dependent on the precision of the user's operation of the mouse. Keep in mind that working with magnified images when drawing measurements helps reduce the margins of error, and working with reduced-magnification images can lead to a greater margin of error.
This also applies to images that have not been calibrated by the scanner and that therefore rely on pixel spacing, as errors can be introduced in the calibration step as well as during the creation of the subsequent measurements.
When the True Size Zoom text overlay is set to 100%—and InteleViewer has the necessary data for computation—images are displayed in true anatomical size to allow for accurate measurements. The magnification factor (derived from DICOM information) used to calculate the anatomical size is also displayed in the text overlay. This applies to CR, RF, XA, DX, and MG images.
When adding a full series to a teaching case, you cannot add measurements to these series.
To save your measurements, you can create a key image series or save a presentation state. Measurements also appear when you print images or export JPEG images.
To save measurements, you must use one of the above methods; otherwise, your measurements will be lost when you close the series.
Degree of accuracy for the measurement tools
The measurement tools were evaluated for accuracy (trueness and precision) against an X-ray image of a calibration object of known dimensions and angles. The trueness and precision for the measurement tools are as follows:
|
Measurement Tool |
Trueness |
Precision |
|---|---|---|
|
Linear |
< 0.1 cm |
< 0.1 cm |
|
Elliptical/Circular ROI |
< 0.1 cm2 |
< 0.1 cm2 |
|
Simple Angle |
< 0.3° |
< 0.3° |
|
Cobb Angle |
< 0.3° |
< 0.3° |
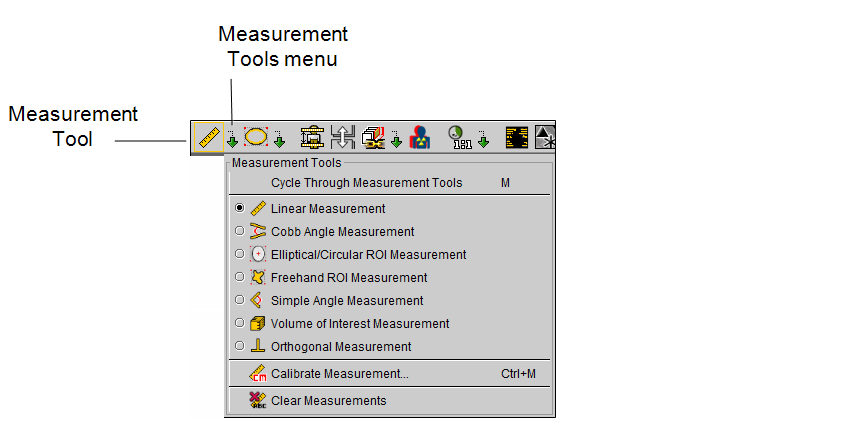
To select a measurement tool:
-
In the toolbar, click the Measurement Tools menu.
-
Select the required tool.
The Measurement tool is updated to reflect the selected tool. This tool will be used when you click the Measurement tool or use the keyboard shortcut (M), until you choose a different one.
The icon indicating the particular tool chosen disappears as soon as you move the cursor, and is replaced by a cross cursor.
-
To select a different Measurement tool, choose it from the menu or press M to cycle through them.
The cursor indicates which measurement tool is active, and the tool appears with a yellow outline in the toolbar.
You can choose a default measurement tool in the User Preferences | Measurements dialog. See Measurement Preferences.