Spine Labeling
Use the Spine Labeling annotation tool to add labels to vertebrae on sagittal view MR and CT images, or X-ray images.
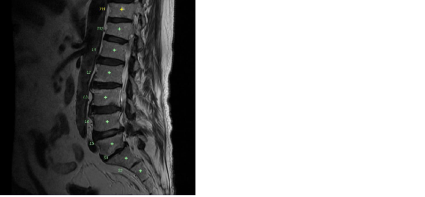
Spine labeling adds two annotations to the image: a marker at the cursor position, to identify the center of the vertebrae, and a label. For MR and CT, markers provide important positioning information for cross referencing in other views. Labels are placed at predefined angles for each vertebra based on the curvature of a typical spine.
You can display both markers and labels or you can choose to only display labels.
For MR and CT images, if you choose to display both markers and labels, adding spine labels to one view causes labels to appear in the same location on all other images in the same study that share the same frame of reference. For example, a spine label added to the sagittal view also appears on the axial and coronal views. The markers are completely editable on the sagittal view. On the coronal view, however, you can only move the label but not the marker. On the axial view, the label is visible and can be moved, but the marker does not appear. Also, the label maintains its position and does not change if the image plane adjusts. If you choose to display only labels, labels you add do not appear on the images of intersecting planes.
Spine labels that you add to an X-ray image are applied to that image only.
To make the Spine Labeling tool the current annotation tool:
-
Select the X-ray image or MR/CT sagittal view image that you want to label. It is important to select an image that displays all of the area of the spine on which you want to place labels.
For MR and CT, ideally you should choose an image slice that is as close to the center of the body as possible.
- In the toolbar, click the Annotation Tool menu.
- Select Spine Labeling Annotation.
To add spine labels:
-
Click the Spine Labeling Annotation tool
 .
.The tool options appear at the top of the active viewport and the cursor indicates that the Spine Labeling tool is active.
- From the Markers menu, select one of the following:
- Display Marker and Labels: Displays both the marker and the label. To make markers appear only when you hover the mouse over a vertebra or a label, enable Auto-Hide Marker.
- Display Only Labels: Adds and displays labels only. For MR and CT images, vertebra labels are displayed on the sagittal view only.
- In the Scheme menu, choose whether to create vertebrae or inter-vertebrae labels.
-
From the Order menu, choose the numbering order for the spine labels:
Order
Description
Automatic (available for MR and CT only)
InteleViewer detects the labeling order according to the first two labels that you apply. For example, if the first spine label that you add is T1, and you then add a label below the first label (T2), subsequent labels that you add will be labeled T3, T4, and so on. If the second label you add is above the first label (C8), subsequent labels that you add will be labeled C7, C6, and so on.
Ascending
Choose this option when adding labels from bottom to top on an image. Labels are numbered in ascending order based on spine anatomy. For example, if the first spine label that you add is T2, subsequent labels that you add will be labeled T1, C7, C6, and so on.
Descending
Choose this option when adding labels from top to bottom on an image. Labels are numbered in descending order based on spine anatomy. For example, if the first spine label that you add is T2, subsequent labels that you add will be labeled T3, T4, T5and so on.
-
Click the image at the middle of the vertebrae on which you would like to place the first spine label.
The label appears several centimeters to the anterior in order not to obstruct the view of the spinal cord.
-
If the label that appears does not correspond to the vertebrae you have chosen, double click the label and then select the correct label from the menu that appears.
The S1 label appears on the image immediately following the L5 label. If you are viewing spine images for a patient with a L6 vertebra and you want to identify the L6 vertebra on the image, double click the S1 label and then select L6. If you want to identify the L5-6 inter-vertebral space, double click the L5- S1 label and then select L5-6.
-
For each subsequent vertebra that you want to label, click the image at the corresponding position.

- Ensure that the Spine Labeling tool is selected.
- Double click the label that you want to edit.
- Select the correct label from the list.
To move a spine label only:
- Ensure that the Spine Labeling tool is selected.
- Click and drag the spine label that you want to move.
To move a spine marker and label at the same time:
- Ensure that the Spine Labeling tool is selected.
- Click and drag the spine marker that you want to move.
To delete a spine label and marker:
See Also