Burning DICOM Data to a CD or DVD
You can transfer DICOM data (images, structured reports, and presentation states) directly to a CD or DVD. You can also choose to include the report, which is saved as an encapsulated PDF file within the DICOM data. Burning DICOM data to a CD or DVD is useful if you want to provide patients with a copy of their study, or to give DICOM data to a referring physician.
To use this feature, ask your PACS administrator to enable the Export DICOM/Burn CDs privilege in your user account. To include the report with the DICOM data, your user account must be assigned the View Reports privilege.
When you burn DICOM data to a CD or DVD, a DICOMDIR index file is created along with sub-folders for each patient, study, and series. DICOMDIR is a DICOM standard index file that describes how the associated studies are stored. You can view the saved images, reports, and presentation states by using any application capable of reading a DICOMDIR file. Individual DICOM (.dcm) files cannot be viewed. When you burn DICOM data to a CD or DVD, a stand-alone version of the InteleViewer application is written to the disc. You can use this stand-alone application to view and manipulate the DICOM data. The InteleViewer version that is saved to disc corresponds to the version on the selected InteleViewer upgrade track.
Before burning the CD or DVD, it is important to ensure that one of the following upgrade tracks for InteleViewer is installed: 4-14-1-P249 or higher, or 4-15-1-P84 or higher. Failure to do so could prevent the stand-alone version of InteleViewer from opening. See Upgrading InteleViewer.
You can anonymize the protected health information (PHI) contained in the DICOM data of a study or series. To use the anonymization function, contact your PACS administrator to enable the necessary privileges in your user account.
InteleViewer does not encrypt the patient health information that is stored in the DICOM data. To protect patient health information, use caution when handling and distributing DICOM data that is on portable storage, such as a CD or removable USB key.
To burn DICOM data to a CD or DVD:
- Ensure that the InteleViewer upgrade track is set to the desired track (4-14-1-P249 or higher, or 4-15-1-P84 or higher). See Upgrading InteleViewer.
-
Insert a blank CD or DVD into the optical drive on your workstation, and wait for the optical media to be recognized.
Multi-session CDs and DVDs are not supported.
-
Do one of the following:
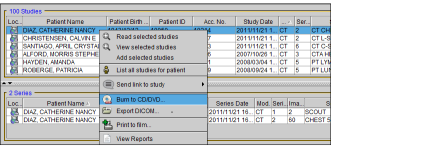
- Open the required study or series and choose File | Burn to CD/DVD.
- In the Search tab, search for a study or series. Right-click the study or series and then choose Burn to CD/DVD. To select multiple studies or series, Ctrl-click each one. Shift-click or click and drag to select a range of studies or series. See About Searching for Studies.
-
Select Include Report if you want to add the report to the DICOMDIR file.
If you select Anonymize, the Include Report option will be disabled. Since reports cannot be anonymized, when you export DICOM data or burn the data to a CD or DVD, you cannot include the report with the exported data.
Since the anonymization process cannot remove PHI data from scanned documents, InteleViewer will exclude any scanned documents from the anonymized study. This feature requires a version of IntelePACS that supports this feature. For information on if this feature is supported on your version of IntelePACS, contact your PACS administrator or Customer Success manager and reference issue number IP-106402.
- If you want the report to contain clinical history, impressions, or key images, select the corresponding options below the Include Report checkbox.
-
Select Anonymize to anonymize the protected health information in the DICOM data to add to the CD or DVD. This option automatically alters or blanks the data that refer to protected health information.
-
Click Burn.
A progress dialog appears providing details on each stage of the burning process. The main stages are as follows:
- The DICOM data for the selected study or series and a stand-alone version of the InteleViewer software is saved to a temporary export folder. If there is not enough disk space on the workstation to create the export folder, an error message is issued and the burning process is aborted.
- An ISO disc image is created based on the contents of the export folder. If the ISO disc image cannot fit on the CD or DVD disc, an error message is issued and the burning process is aborted. InteleViewer determines if the DICOM data fits on the CD or DVD after an ISO disc image is created. Since gathering data and creating the ISO disc image can be a lengthy process, you might have to wait before knowing if the burning process is successful.
- The ISO disc image is burned to the CD or DVD.
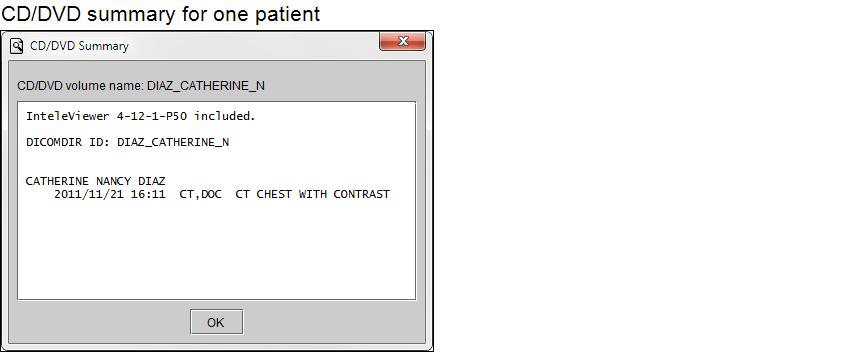
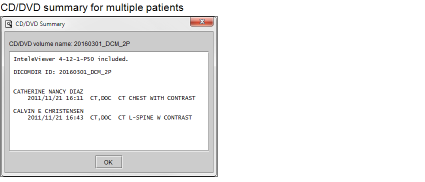
When the process is complete, the CD/DVD Summary dialog lists information about the study that was burned, and the InteleViewer version that was written to disc. The DICOMDIR ID and disc volume name are derived from the patient name. If studies for different patients are burned to disc, the DICOMDIR ID and disc volume name are derived from the burn date and the number of patients.
If the study or series has been anonymized, this screen will display [Anonymized] at the end of the DICOMDIR ID line, and the CD or DVD will be named ANON_INFO.


To have access to the report options, you must have the View Report privilege enabled. For more information, contact your PACS administrator. The report option settings are stored locally on your workstation, and do not roam.
If you disable Add Key Images to the Report and the default template supports key images, then key images will appear in the report. If you use grouped procedures in your workflow, the requested procedure ID also appears in the Study Information to identify the report.