About Configuring Mouse Shortcuts
You can streamline and increase your productivity by configuring your mouse buttons to act as shortcuts to various InteleViewer tools and commands.
For example, you can create a CT toolset that includes the tools most relevant to working with CT studies. If you are using a five-button mouse, you can assign your buttons to the following tools:
|
Button |
Tool |
|---|---|
|
Left |
Stack |
|
Right |
3D Cursor |
|
Middle |
Window Level |
|
4 |
Linear Measurement |
|
5 |
Angle Measurement |
You can assign two tools to certain mouse buttons. You can assign one tool that is activated with only a click of the mouse button (click-only tool), and another that is used with a click of the of the mouse button, as well as a drag of the mouse button (click-and-drag tool). If you only click, you get the click tool. If you click and drag, you get the click-and-drag tool.
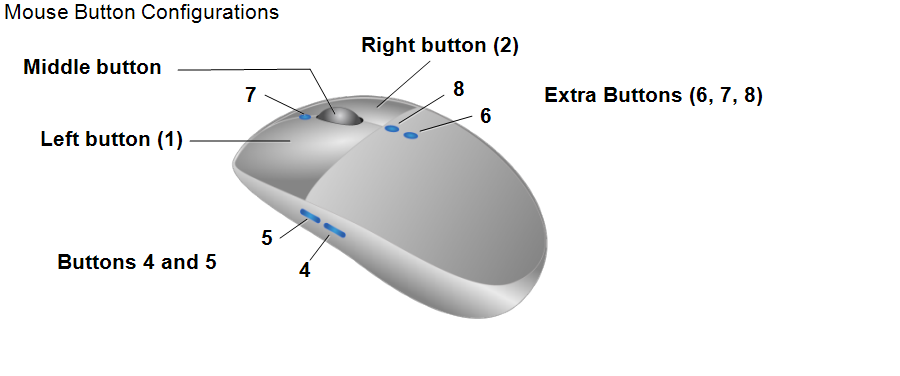
You can assign a different tool or command for each of your mouse buttons. The number of tools and commands that you can configure depends on the number of buttons on your mouse. For example, your mouse may have three primary buttons—the left, right, and middle buttons—or five or more buttons.
If you are using a mouse with more than five buttons, configure the extra buttons using keyboard shortcuts.
If you are using, for example, a three-button mouse with a scroll wheel, the wheel is reserved by the system for navigation purposes. If you configure the scroll wheel in Windows to be used as a third mouse button, you can assign the middle button to specific manipulation tools.
Certain mouse buttons are reserved for specific functionality and cannot be assigned to a tool. Some buttons cannot be assigned tools that are used with a simple click action; but may be used for tools that require a click-and-drag action.
You can configure the mouse buttons as follows:
|
This button: |
Is reserved for: |
And can also be used in this way: |
|---|---|---|
|
Left (1) |
The starting tool, which is the tool that is active by default when a study is opened. |
To interact with the user interface. |
|
Right (2) |
Launching the radial menu or toolset and patient menus. |
To assign to these click-and-drag tools: Zoom, Window Level, Pan, Stack, 3D Cursor, and Free Rotate. |
|
Middle (scroll wheel (3) |
Navigation purposes. |
|
|
Middle (button) |
|
To assign to these click-and-drag tools: Zoom, Window Level, Pan, Stack, 3D Cursor, and Free Rotate. To assign click-only tools and commands, such as Toggle Stacking, Invert, Show Key Image Composer. You can only use the click-only tools with the middle mouse button when viewing multi-image series in a viewport. Even if you assign a click-only tool to the middle mouse button, when you use the middle mouse button in a viewport displaying a single image, the Navigate Through menu appears instead of the assigned tool. |
|
4, 5 |
|
To assign to click-only tools and commands. |
|
Extra (6, 7, 8) |
|
To assign to keyboard shortcuts. |
When assigning a button to a measurement or annotation tool, you first click and release the button to select the tool. You then use the left button to perform the task. This is also true for the Magnification Glass tool and the Drag and Swap tool. For example, if you assign button four to the Linear Measurement tool, you first click button four to select the Linear Measurement tool, and then use the left button to perform the measurement.
Do not move your mouse after clicking and releasing the button or the command will not be performed.
The tools currently assigned to the left, right, and middle buttons are displayed in the bottom right corner of the status bar. The following example shows that the left-mouse button is assigned to the Zoom tool, the middle-mouse button to the Pan tool, and the right-mouse button to the Window Level tool.
