Creating New Protocols
Though a default print protocol is provided for each printer, you can create your own custom protocols to save commonly-used print job settings.
To create a new protocol:
- Open the Print Film window. In the InteleViewer main window, choose Print | Print Film or press Ctrl+P.
-
Choose Print | Film Print Protocol Settings or click Film Print Protocol Settings
 on
the toolbar.
on
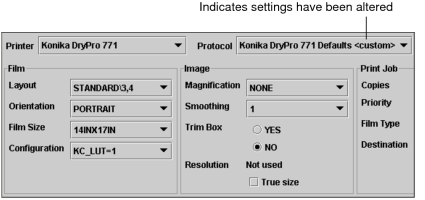
the toolbar.The print protocol settings for the selected printer appear.
- Choose a printer from the Printer list.
-
Configure the settings as required. For example, change the layout and orientation, or choose to print multiple copies.
See Customizing Individual Print Settings.
As you change the settings, the Protocol list updates and appends the word <custom> to the selected print protocol. Also, the Update Protocol and Remove Protocol buttons become active.
-
Click Save Protocol.
The Save As New Protocol dialog appears.
If you do not save these settings as a new protocol, your changes will be lost.
-
Enter a descriptive name for the new protocol and click OK.
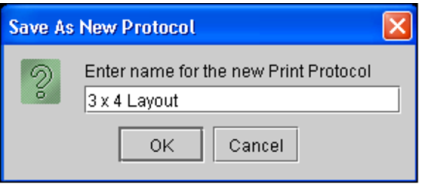
The new protocol is created and appears in the Protocol list. It can be applied to any print job.

