Exporting Images for Display and for Print
You can choose to export the image in the selected viewport or all images in the series. You can increase or decrease image dimensions from the original DICOM image size and you can choose to export the image as shown in the viewport (with any manipulations you have made). If you choose to capture the viewport view, window level, zoom, and rotation adjustments appear, as well as the text overlay and image overlay information, annotations, and measurement tools.
This feature is accessible from either the application window, the Print Film window, the Teaching Case Viewer, or the Key Image Composer.
To export an image:
- Select the required image by clicking its viewport.
- If required, manipulate the image. For example, pan, rotate, and zoom the image, adjust the window level, add annotations, or hide the text overlay and image overlay.
-
From the main menu, choose File | Export Images or press Ctrl+Shift+E.
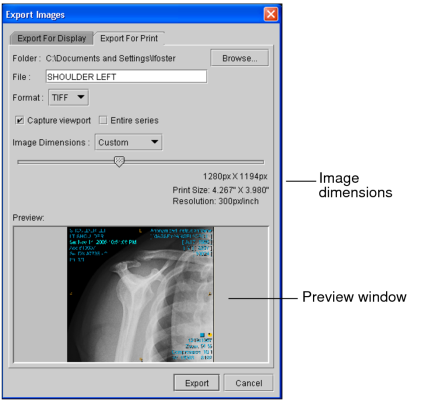
The Export Images dialog appears with a view of the image in the preview window.
-
Do one of the following:
- To save the image for display on screen, chose the Export for Display tab.
- To save the image for display in print, chose the Export for Print tab.
-
Configure the export settings, as required:
Option:
Description:
Folder
Sets the location where the image is saved. Click Browse, navigate to the folder in which you want to save the file, and click Select Folder.
File
Sets the file name. By default, the file name is the same as the study description. Each image is saved in your folder with the study as prefix followed by a number that is incremented by 1. For example, CT Leg 001.tif, CT Leg 002.tif, and so on.
Format
Select the format of the image.
Capture Viewport
Exports the image as it is displayed in the viewport, including any zooming, window-levelling, text overlay, image overlay, and so on. Disable this option to export the DICOM source image.
Entire Series
Exports all images in the series. Disable this option to export only the selected image.
Image Dimensions
Sets the visual characteristics of the image. Select Custom to set the image dimensions by using the slider. Select From DICOM to create an image that is the same size as the original DICOM source image. When exporting for print, the print size and resolution appear. The image resolution is always set to 300 DPI.
These settings are saved and applied automatically to subsequent exports. You can however, change these settings again at any time.
-
Click Export or press Enter.
The exported images appear in the specified directory.
- To change the configuration of the export settings, repeat steps 3 to 5.
