Measuring Orthogonal Lines
The orthogonal measurement tool allows you to measure the width and height of an irregular area, such as a lesion. Use the area’s longest diameter as the reference length and the widest portion of its perpendicular diameter as the orthogonal length. Once you have created the measurement, you can move and resize the lines separately or rotate the two lines together as required.
To measure orthogonal lines:
- Click the Orthogonal Measurement tool
 .
. -
Click and drag at the starting point of the measurement.
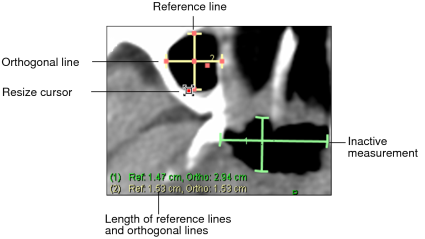
The orthogonal line is perpendicular to the reference line with both lines intersecting at their centers. The length of the reference line and the length of the orthogonal line appear in the bottom left corner of the viewport.
-
To change the angle or adjust the length of an active measurement, move the mouse cursor to the end of the line.
The Resize cursor appears.
- Click and drag to move either end point. Release the mouse button when you are finished.
-
To relocate an active measurement, move the mouse cursor to the middle of the orthogonal or reference line.
The Move cursor appears.
- Click the left mouse button and reposition the line. Release the mouse button when you are finished.
- To add an annotation to a measurement, double-click the measurement and enter text.
