Increasing Image Quality
You can specify the quality at which images initially display by setting an image compression ratio per modality in the user preferences. The compression ratio you choose largely depends on your network connection. For example, a high compression ratio, such as 15:1, ensures that images load quicker on slower networks due to lower image quality. Lower compression ratios, such as 3:1, provide higher initial image quality but require faster networks for the images to load quickly.
When you first open a series, InteleViewer progressively refines the quality of the displayed image to the specified image compression ratio. InteleViewer uses the image compression ratio setting in the user preferences as the recommended compression when opening a series. Depending on your network connection, however, InteleViewer may open the series at a lower compression ratio in order to provide the best possible image quality.
Once an image is loaded, if you require increased image quality you can manually increase the quality incrementally or go directly to full quality (lossless compression). When you increase image quality, you can do so for all images in the series or for a selected image only.
Lossless images have a slight compression ratio applied while still providing full image quality. The lossless compression ratio varies depending on the image contents. Typically, it is 3:1 or 2:1 but it can go as high as 20:1 for images containing very little information. If the image compression ratio set in the user preferences matches, or is lower than, the lossless compression ratio for an image, the image is loaded until lossless compression (full quality) is achieved. For example, if the image compression ratio is set to 2:1 in the user preferences, an image with a lossless compression ratio of 3:1 will open in full image quality.
The current compression ratio for the image is indicated in the text overlay. While the image is loading, the image quality icon appears gray to indicate that image data is still arriving, and the progress bar displays the percentage completed for the series. When an image is displayed full-quality, the image quality icon appears as a full green circle and the word “lossless” appears as the compression ratio.

For compressed images, the text overlay displays the current compression ratio and the icon appears as an incomplete amber circle.

For lossy DICOM JPEG images, the image compression ratio is ignored since images are loaded at the maximum compression ratio. When an image is displayed, the icon becomes a full amber triangle and the word “lossy” appears as the compression ratio in the text overlay. When opening or importing a truncated JPEG image, InteleViewer displays the image as lossy.

To increase the quality of a series:
- Select the series.
-
To increase the series image quality incrementally, press Back quote (`) or choose Tools | Increase Series Quality.
Each time you do so, the quality is increased to the next compression level.
-
To increase the series quality to a specific compression ratio, choose a compression level from the Image Quality menu in the toolbar.
You may reach lossless compression if the option you chose corresponds to, or surpasses, the lossless compression ratio for that image. Once the entire series reaches lossless compression, the menu is disabled.
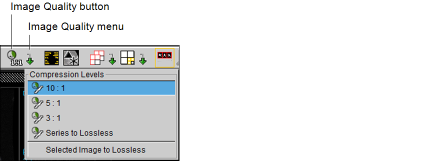
-
To increase the series to full quality, choose Series To Lossless from the Image Quality menu in the toolbar, press Ctrl+Back Quote, or click the Image Quality button
 .
.All images in the series are displayed in full quality.

To increase the quality of a selected image to lossless:
- Select the image.
-
In the Image Quality menu, choose Selected Image to Lossless.

The selected image in the series is displayed in full quality. The other images in the series are unaffected.

See Also