Viewing Scanned Documents
In the Document Viewer, you can view scanned documents that are associated with an order, such as requisitions and consent forms stored in IntelePACS, InteleRIS, Pro Medicus, Fuji Synapse, Streets Heaver's Compucare, and Comrad Medical Systems's COMRAD RIS and Aura RIS. You can also view the scanned documents for all priors associated with the current order.
To use this feature, ask your PACS administrator to enable the View Scanned Documents privilege in your user account.
You can set the Document Viewer to display only documents of specific types, such as HISTORY SHEET and SCRIPT. If you would like to limit the type of documents that appear in the Document Viewer, have your PACS administrator contact Intelerad Technical Support to filter out the unwanted document types.
The Document Viewer window does not appear when InteleViewer is in De-identification mode.
In the Document Viewer, you can view Adobe Portable Document Format (PDF) files and scanned documents saved as the following image files:
- PNG
- JPEG
- BMP
- GIF
- TIFF (including multipage TIFF)
- JPEG 2000
Your IntelePACS may be configured to also show DICOM scanned documents in the Document Viewer. Otherwise, you can view a DICOM scanned document as a regular series image in the viewports.
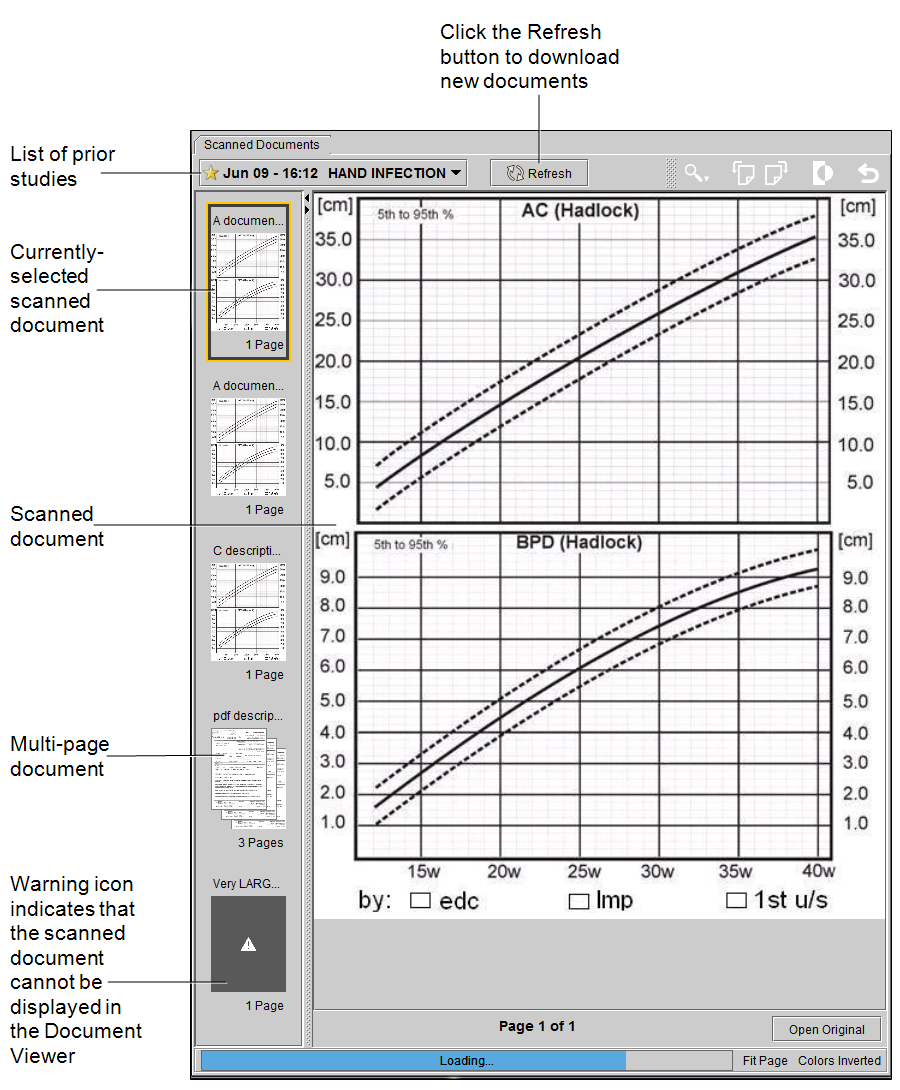
The Document Viewer displays document thumbnails, which are miniature previews of the pages in the scanned documents. Click a thumbnail to open the first page of that scanned document. If the selected order or accession number contains a Requisition document, that document's thumbnail appears first in the Document Thumbnail pane.
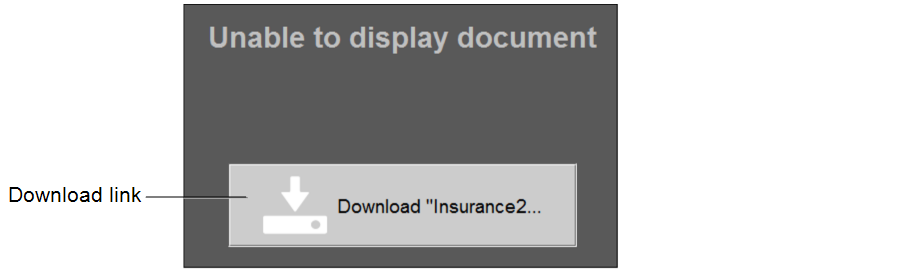
For unsupported document types, an empty document thumbnail appears with a warning icon.
The label at the top of the thumbnail indicates the type of the document (such as Requisition, Insurance, or HIPAA form), shortened title, or its number in the series of documents for the order (such as “Document#2”). You can also hover your mouse cursor over a document to display the full title.
The label at the bottom of the thumbnail indicates the number of pages. A question mark (?) indicates that the page count information is unknown. The word “loading” appears when the document is not yet fully loaded.
If the scanned documents associated with the selected order or accession number are stored on different InteleRIS, Pro Medicus, or Fuji Synapse instances and InteleViewer encounters a problem trying to connect to one of the instances, the status bar displays a warning icon and an error message indicating that there is a connection error and that some of the documents may be missing.
You can use the following tools to manipulate scanned documents:
|
Click: |
To: |
|---|---|
|
|
Choose the magnification of the documents: Fit Page (default), Fit Width, Fit Height, Actual Size, 50%, 150%, or 200%. |
|
|
Rotate the current page left or right in 90-degree increments. |
|
|
Inverts the text and background colors for the document. |
|
|
Revert the documents to their original magnification, orientation, and color settings. |


To view scanned documents:
-
From the worklist or the Search tool, open the order that contains the scanned documents that you want to view.
If you have your Document Viewer preferences set to open the Document Viewer automatically, the Document Viewer appears when you open the order.
- If necessary, click Show Scanned Documents in the Patient Record tab.
-
To view the scanned document for a prior study, in the Document Viewer, select the prior study in the list.
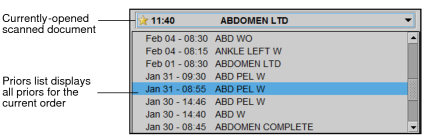
- To view scanned documents associated with an aliased study or a linked study that is not the leading order, select the study from the Document Viewer's prior studies.
- To view the scanned document, click a document thumbnail.
- To download the original document and open it in the application in which it was originally created, click the Download link for unsupported document types .
-
To navigate between pages in a multi-page document, use the navigation arrows underneath the scanned document.
If the Zoom mode is set to Fit Page, you can use the mouse wheel to scroll between documents or between pages in a multi-page document.
- To manipulate the scanned document, use the tools in the Document Viewer .
- To close the Document Viewer window, click the “x” button in the top right corner of the window. To reopen the Document Viewer, click Show Scanned Documents in the Patient Record tab.

See Also